Welcome to the Digital Garden of a Pragmatic Engineer 🚀
Hi. Welcome! Let there be Light!
I am Andrei Clinciu. I’ve been coding since I was 13. That’s 20+ years of navigating the evolution of the web. From static HTML and Perl (or C) CGI to over-engineered cloud clusters, and finally, back to the beauty of simplicity.
This site is my “Public Research Lab”—a place where deep industry experience and mastery meets the curiosity of “Beginner’s Eyes.” It’s kind of interconnected with my personal website
🎯 The 100-Day Vision
I am currently on a journey to document 100 days of DevOps, Architecture and Full Stack Development, with a long-term goal of reaching 300 days worth of content. This isn’t just a blog; it’s a live walkthrough of building high-performance, secure, and decentralized systems. It may take some time and the publishing schedule will probably not be daily as this is free content without any sponsor;). If you enjoy the content and want to support me, send me a message with words of encouragement or become a Premium user on the community forum.
What you’ll find in this lab:
The 100-Day Log: Daily “in-the-trenches” documentation of building a Private Hybrid Cloud on bare metal.
Pragmatic Architecture: Why I often prefer systemd over Kubernetes and Plaintext over complex binary formats.
Sovereignty & Open Source: My move away from Big Tech centralization towards self-hosted Fossil SCM and Gitea. Reducing costs, increasing privacy and adding much more automation power.
The Vault: Things I’ve learned over the years that I never properly documented on my personal site.
Minimal Artificial Intelligence Usage
I want to use my own intelligence therefore I’ll be using minimal AI. If I do use AI it’s for restructuring ideas, improving business writing or deep research. Most of which I prefer to do on my own anyway, because I like a challenge. Train your brain.
If we all begin using AI all the time we’ll end up like the people in wall-e and idiocracy.
I recommend when you have a time to read the book “The Civilization of Illiteracy by Mihai Nadin” (Get it for free on GUtenberg!) written 1997! You’ll understand what began happening before AI was introduced, and how AI is a step in dismantling civilization and culture due to it’s brain rotting multiplier effect.
Use AI responsibly. Use your marvellous brain instead;).
Subsections of Full Stack Devops - Code - Infrastructure - Linux
Chapter 1
The 100-Day DevOps Logbook
🛠️ The 100-Day DevOps Logbook
Welcome to the 100-day DevOps Challenge LogBook. This is meant to be followed by beginner or experienced devops engineers, software developers (frontend, backend, fullstack) and anyone wanting to get into technology. Remember, DevOps as it’s defined is a company culture, not specifically a job position.
This is a day-by-day, raw, and unfiltered look at building—and sometimes breaking— modern infrastructure. We’ll be exploring tools and skills which are essential for Full Stack Developers AND DevOps engineers alike.
Full Disclosure: I have a specific vision in mind and want to prepare you for the real world in a unique hands on way. As much as I like structure and getting to an end goal this is an experiment and you will notice some unique patterns and different thinking. Remember, different and unique thinking is what got us to technology. Life is messy, and so is engineering. Some days will be about high-level architecture (Solution Architect style), while others will be about a single, beautiful unix or linux command that saved my afternoon.
Pragmatism and Simplicity First: We favor tools that are fast, secure, simple and self-hosted. No bloat allowed. DevOps has become bloated due to enterprise “needs”. Solutions can be simple and elegant.
Mastery via Re-learning: We look at everything with “Beginner’s Eyes,” even the things I’ve done for 20 years.
Honest Progress: No AI-generated fluff. Just real human thoughts and experiences together with machine generated logs.
We’re going to go deep into unconventional DevOps technologies and decisions which are not covered in most courses due to the fact that everything I do is quite unconventional.
This 100 day devops challenge is meant for you to go through day by day and experiment with the tools, commands and programs on your local environment. Of course you can JUMP around t othings which interest you come back.
Very IMPORTANT Note, this is MY VISION of DevOps and Software Engineering, you’ll see my OPINIONS, while I am flexible, you are free to adopt any opinion you want, choose what works for you;) In software engineering you can solve any single problem in 100 ways. It’s important to have OPTIONS and choose the best one without going to extremes of “not having any option” or “analysis by paralysis”.
Follow VIDEO and read the text. Whenever I record a video, please note that what I will be discussing there could seem similar, yet will mostly be different from the text on the 100 days individual, so read the text AND follow the video.
To be honest, I spent so much time writing code to automate things or build complex applications that at multiple points I had to redecide to KISS keep it simple seriously.
Most software engineers, managers and even devops engineers have no idea how simple it is to build and run things. New engineers (devops, backend etc) are flooded with complex solutions for problems which create eve more problems. A FreeBSD jail will solve more problems than trying to fit kubernetes into the mix.
It’s the simplicity I’m after, only after we grasp and understand the basics can we consider scaling up vertically or horizontally properly.
If there’s one thing you remember after finishing these 100 days is that you should look at everything with the eyes of a beginner but also with skepticism. DO you really need the complexity? This is what a Soluton Architect should do but you as a software engineer or devops also need to think about this.
Small Steps Daily
We are taking small steps daily as to
1 not overwhelm beginners or add unneeded complexity
2 show how easy it is to think of new solutions
3 understand the flux without complex tools frameworks
4. Understand when and where those tools are good
Adding features as we go along.
We want to work iteratively (true meaning of devops) and improve as we go along
Everything we do in engineering has drawbacks. 100 potential solutions
Simple easy elegant means short time to production which is what matters .
Using Linux for everything. It’s expected you already understand the basics. I’ll provide links but you need to take time and experiment.
Deep Dives: Building a “Private Hybrid Cloud” on my 90GB RAM Linux workstation in combination with some older notebooks and raspberryPI’s AND superscaling with AWS or other clouds providers including Cloudify, Linode and others.
TIL (Today I Learned): Short, punchy snippets. A weird iptables quirk, a Go trick, or a Fossil SCM command.
Reflections: Experiments. What went well, what went wrong
Soft Skill References. We’re also talking about very important soft skills every now and then which are required to succeed in engineering.
Don’t just watch the grass grow. Grab your own workstation, break something, and document it.
What you’ll need for this
Internet access (obvious)
A Laptop or workbook with a minimum of 16GB, recommended 32GB of RAM. Heck, I used to virtualize whole operating systems on a 4GB RAM machine back in 2009;).
“The expert is a man who has made all the mistakes which can be made in a very narrow field.” – Niels Bohr
Day 1: The Static Foundation - Automating Hugo Like a Pro
The first step in the 100-day DevOps and Solution Architecture journey, is learning how to build and deploy static websites with a simple continous integration and continuous CI/CD pipeline in bash. Most Developers never launched a single website or managed a basic VPS in their entire careers. This is concerning.
I’ve been coding for 20 years so I’ve seen the web cycle through endless bloat HTML 3, HTML 4, Flash, and now JavaScript bloat. For this project, I’m returning to the most efficient stack possible. Static sites with Hugo. (Video walkthrough available)
Why Hugo?
Hugo is a static site generator written in Go. It’s a single binary you can copy and paste around. THis means no need for any dependencies, no npm install hell, no broken dependencies, and zero maintenance. Plug and play ready. It’s perfect for documentation, blogs, and even commercial sites that need to be lightning fast. If you deploy a site with Hugo it’s going to be almost 100% secure (unless you manage to somehow add a NPM cryptobot to your local environment :facepalm:)
It has image processing built in (convert, resize, crop, rotate, filters). Javascript bundling (tree shaking, code splitting), sass processing and also tailwindcss. Contains a built in embedded web server for local development. Everything in one single binary.
If you’re a software developer or devops engineer chances are at one point in your life that you will need to build a site for yourself, someone else, a project you’re passionate about or just a documentation for a work project.
Hugo is perfect for this job. It renders a static site from markdown or asciidoctor content (but it’s configurable to other formats aswell). COnfiguration is done with TOML or YAML which is the default DevOps configuration nowadays. So by using it you’lll most likely have shareable skills.
With jamstack you can easily add a headless cms or basic web shop to extend hugo and add dynamic features to it. Adding a hugo repository to git or fossil and a CI/CD pipeline can simplify content creation.
What You will accomplished today:
Initialize the site using the Relearn theme, which provides the professional “Technical Wiki” feel I want for this journey.
You’ll learn how to set hugo up, experiment with it and as a bonus I’ll give you a simple CI/CD bash script to take your hugo output and publish it as a static site. We’ll cover the details of setting a Linux virtual private server for your website in future days;). For now stick to the basics.
To simplify our lives we will be installing git, golang gohugo so that HUGO can automatically fetch templates, you can only choose to install gohugo and manually download a template, see step 2. down below
# On Linuxsudo apt install git golang gohugo
# On Freebsdsudo apt install git lang/go125 gohugo
1. Site Initialization with a themplate:
Initialize our site
hugo new site fullstackdevops.eu
cd fullstackdevops.eu
Option A hugo modules
hugo mod init fullstackdevops.eu
hugo mod tidy
What the above does is create a new directory and initialize hugo modules. So it can automatically fetch the layout template from github in the next step, otherwise you’d have to manually download and copy it to the layouts folder.
Which you can do as an exercise, using git submodules as layouts is also a good way to get the newest version of a layout template. Feel free to change the site name to something of your own;)
OPTION B Manually download template
Option B is to manually download a ZIP from https://themes.gohugo.io/ with a theme you like, put it in layouts and then edit the confirugration as shown below
There is a plethora of documentation out there on how to configure and use hugo, I’m not going to go into the details. There are even some books on this
3. Configuration (hugo.toml):
I’m using Hugo Modules to manage the theme. It keeps the repository clean.
If you use option B comment the module.imports section
Most people spend hours fighting GitHub Actions or complex CI/CD pipelines doing over engineering. I spent 5 minutes writing a Bash script which acts as a basic CI/CD pipeline. It’s fast, reproducible, and requires zero external dependencies.
This script builds the site, minifies the assets, tars the public folder, and ships it via SCP to a virtual private server (VPS)virtual machine on any cloud.
It uses basic unix and linux tools which are available by default on any linux distribution. These tools have existed for the past 30 years and will continue to exist in 30 or more. (ssh, scp, tar etc;).
build.sh
#!/usr/bin/env bash
# Build the site with garbage collection and asset minification onhugo --gc --minify
# Package the public output folder as a gzipped tar - you can use lz4 or whatever yo uwanttar -czvf fullstackdevops.eu.tar.gz public
# Ship it to the VPS (Custom SSH port for security)scp -P 2327 fullstackdevops.eu.tar.gz fullstackdevops:~/
# Remote extraction into the web rootssh fullstackdevops "tar --strip-components=1 -xf fullstackdevops.eu.tar.gz -C /var/www/fullstackdevops.eu"
Whenever I make any change in markdown I just run ./build.sh and the site is built and automatically updated;).
The Secret Sauce: SSH Config
To make the script above work, I use a simple ~/.ssh/config entry. This keeps my credentials and port settings out of the script and in my local environment where they belong. We will explore setting up SSH in future days;). If you don’t have SSH setup it will ask for a password, however, in my case, it will automatically work with no password.
Host fullstackdevops
  Hostname fullstackdevops.eu
  User youruser
  Port 2233
Video Walkthrough
If you want to see exactly how I set this up and why I prefer this “Lean CI/CD” approach, check out my full video tutorial:
Now that the “Press Release” platform is live, Day 2 begins. In the next days we’ll dive into the “Art of Writing”, setting up the Local Homelab, Using virtualbox and then going on to real virtualization used by big cloud providers with KVM and libvirt;).
Getting hugo up and running on public world facing Linux server involves some extra steps not yet discussed here( some of them are explained in the video referenced above), which if you’re new might seem overwhelming. STOP don’t jump for an API or cloud service, you CAN and will do these manually, start with the easiest of all. Static hosting then a VPS!
In future days I’ll show you how:
to setup your own Linux VPS - The above example expects thi
Install, configure and use caddy as a reverse proxy and static site hosting
Using SSH keys to login and automatically allow scp/ssh towork
Many more features
Security note
In enterprise reality we might add code review and a git hook or even IAM roles. Ssh key would not be given freely to developers for production access. But those steps can and will be easily automated in future days :-). Enterprise vision and best practices are not always followed even in larger companies. (I’ve seen this!)
We want to follow the devops and agile mantra’s of working in iteration
Day 2: The Art of Writing - DevOps FullStack Secrets
Writing is an integral important part of what we do in the modern world and more so in the complex DevOps or Full Stack Development world. Indifferent if you’re a software engineer writing code or a devops engineer writing bash or terraform automation scripts. You’re writing. All the time. Writing is a form of communication we need and do on a daily basis; SMS, emails, documentation, executive summaries for management or explaining ideas to non technical customers . As any skill, writing improves with practice.
Writing is Thinking
Writing is thinking and writing WILL help you organize your thoughts and ideas. And writing helps us organize our memory. There’s ample research stating that writing IS one of the best psychotherapy emotional processing tool out there 1
I know there’s a preconception of programmers and IT people being introverted and lacking intrapersonal communication skills. It doesn’t have to be that way. As you’ve mastered your craft, you too can master the art of communication.
Make your work visible
Most of the tech work we do is invisible and unknown to others (managers, colleagues, etc). Writing about it helps us document the steps we’ve taken. Writing improves our retention and understanding. It will also give you a chance to explain WHY an idea is good or bad. If you’re like me you may solve tens to hundreds of different problems a day. I used to document only the most complex problems. It’s very liberating when we can go back to our notes on a daily basis for things we’ve solved before or just to review ideas and solutions. In reality, we should aim to document anything which takes more than 5 minutes to solve.
Take the time to document and write down the problems you had and how you solved them. Your our future self will thank you. And so will other people, How do you think the internet works?
Brain Overload - Externalize information through writing - Building a Second Brain
We can’t store everything in our brain. This is why it’s much more important to be able to know and be able to solve a problem than to learn a manual entry by heart but being unable to use it.
Afraid of sharing your writing? Thinking that it’s not that good? No need for perfection. 3 steps to success
just write everything down as in a brain dump without worrying about grammar, logic, order. Just write what comes to your mind ignoring your critical self. Keep it in a draft. Let it incubate, and come back later. 1 day later is perfect.
Read it, edit it and iterate as many times a you want. THe more you EDIT the better it becomes. The more you will train yourself to remove excess the more succint you can become. At the beginning you will probably write 3 A4 pages for an idea and then summarize it down to 1 A4 page.
AI atrophies your brain- You loose valuable creativity, thinking, memory and communication skills.. Don’t use AI unless you want to brainstorm or want to gather intel on how to present an idea to stakeholders but already provided it with a lot of ideas. Always use your OWN brain and thoughts. Instead of externalizing your thinking, you build valuable skills. Becoming irreplaceable. Your brain is accumulating cognitive debd when using AI assistants which impact creativity, critical thinking, memory and communication skills2. All essential to succeed in life.
Do the above steps even if you never publish anything and decide to keep your documentation local.
Remember that not every word, idea book, documentation has equal worth. It’s also important to be ruthless in selecting what has worth.
I won’t go over this unique skill today, we’ll explore bits of it in future days;).
Ratings
I made a promise to myself to write more and I kept it, even if I didn’t publish most of what I wrote, I have more than 3000 A4 pages worth of notes and writing. It might seem like wasted time and effort. Thinking through writing has helped shape my mind, thinking and way I see the world.
Book Recommendations
I’d recommend reading 3 distinct books to get an idea of how to actually get things done by taking notes. You may also want to take hand notes instead of going 100% in the technology route;). Your hand brain pathways will thank you.
Bullet journal method by Ryder Carroll
How to take smart notes by Sonke Ahrens
GTD getting things done by David Allen
Mix and match ideas and build your own system. Most important of all, keep it simple. Don’t overcomplicate. Interconnect your notes. It will take time but the results will be great.
There is no perfect note taking app, just start taking notes
Start with Zim Desktop Wiki, it has everything you need. Yes, you can export to markdown,html, pdf. And you can collaborate with other technical people through git or fossil scm.
You can experiment with SilverBullet, VSCode + Foam(keeping this locally), or Vim/Neovim.
One pitfall is to try to search for the perfect note taking app. Please don’t start migrating your notes and going from one app to another. Don’t get caught up in the zettlekasten knowledge management trap either. All apps have pro’s and con’s.
I’ve been there and you will spend more time fiddling around making a system work for you instead of taking notes. This is not healthy nor sustainable
I’ve actually built my own notes sytem twice and used things like vim and tens of different software.
If you plan to collaborate with other non technical people then you might want to take a look into Wiki Go
or usememos (not the react hook, the golang notes app)
I strongly recommend Zim Wiki or SilverBullet (which is programable)
Plaintext is the best format to use for documentation and notes
The best file format to use when writing ideas is not html, not some private binary format, nor word docx/odt. Keep it in plaintext.
Plaintext will be readable in 100 years, while we don’t know if binary formats will still work then.
There are quite some plaintext options including markdown, asciidoctor, html, etc.
Asciidoctor provides many extensions which are lacking in markdown. It’s supported by github by default, it’s used to build books PDF’s and epub’s, you can template and design it. There’s even a presentation module with revealjs for asciidoctor.
Even if you don’t use asciidoctor, keep your notes in markdown or a variant which will work on any device while used in any source control management system like Git or Fossil SCM.
Start Writing NOW
Download Zim Wiki or open any editor and start writing in asciidoctor or markdown NOW.
Day 3: The Gateway to Linux - VirtualBox Virtualization & Beyond
If you want to master DevOps, you must first master Virtualization and Linux. It is the absolute backbone of everything we do—from the smallest local lab to the massive clusters at AWS and GCP.
Today, we are looking at the best entry point for anyone starting this journey: Oracle VirtualBox. (Formerly known as Sun Microsystems VirtualBox)
Why VirtualBox?
Oracle VirtualBox is fantastic for beginners. It’s a Type-2 hypervisor, meaning it runs on top of your existing Windows, Mac, or Linux OS. It’s the perfect “sandbox” where you can break things, delete partitions, and mess up configuration files without any risk to your host system.
This is the FIRST step before actually installing Linux on a live system either as the sole or dual boot system.
There is no shame in using VirtualBox. Even as a Senior, I’ve used VirtualBox extensively up untill 5 years ago when I finally switched 100% to using LibVirt and KVM for all my virtualization needs.
I appreciate its simplicity for quick tests and recommend it to complete beginners. It even supports:
Terraform Providers: You can test out your terraform scripts!
Vagrant Integration: For reproducible development environments.
Snapshots: Take a snapshot in time of your virtual machine and the “magic” “Undo” button for your mistakes.
🎥 Tutorial: Try Linux WITHOUT Deleting Windows
The most important aspect in DevOps is learning and using Linux and Unix. If you’ve only used Windows or MacOS then experiment 1 month with using exclusively Linux in virtualbox in fullscreen. Meaning you
I’ve recorded a complete, step-by-step guide on how to get started. I recommend using Debian or Linux Mint (great for beginners) and I explain the “Why” behind virtual machines—from security to privacy.
What you’ll learn in the video:
[00:00:13] What are VMs? Understanding how they slice your CPU and RAM.
[00:01:25] Safety & Security: Using VMs to browse safely or test untrusted code.
[00:02:39] Choosing a Distro: Why I recommend Linux Mint or Debian for starters.
[00:05:56] Installation: Setting up your first VDI (Virtual Disk Image) and installing Linux.
[00:12:19] Guest Additions: How to enable full screen and shared clipboards between your host and guest.
🚀 The “Unicorn” Path: Moving to KVM and Libvirt
While VirtualBox is a great teacher, “real world” production virtualization on Linux usually happens at a deeper level.
If you look under the hood of the world’s biggest clouds, you won’t find VirtualBox. You’ll find KVM (Kernel-based Virtual Machine) and Libvirt.
Performance: It runs at near-native speeds because it’s part of the Linux kernel.
Industry Standard: This is the tech that powers the modern internet.
Next up in the 100-Day Challenge: We are going to “level up.” I’ll show you how to set up KVM and Libvirt on Linux (day 5) to build a professional-grade private cloud 004-homelab-infrastructure)](003-homelab-infrastructure)
Homework: Follow the video, install a Linux VM (I recommend Debian), and try to navigate the terminal. If you’re feeling brave, try installing Whonix for ultimate privacy as I mentioned at [00:14:34]!
Day 4: Home Lab Infrastructure - Personal Cloud Setup
Today you’ll be exploring ways to build your own personal cloud on your own hardware at home. Therefore escaping the “cloud tax” and enhancing your learning experience. As a DevOps your job will also be thinking about “infrastructure”, setting up infrastructure and communicating with management. If you’re serious about enhancing your skills, you will want to consider getting your own hardware.
This also applies for software development, proving you can own the hardware will get you ahead of 95% of developers who can barely deploy their own software. This is kind of a prequisite for day 5 where you’ll go ahead and setup kvm libvirt virtualization on linux.
Own it!
Owning your own hardware and proving you can manage it is a competitive advantage for any job. It’s a project which will put you ahead of most other developers or sysadmins.
It isn’t expensive and will give you the most experience because you can test things and break your “environments” as you wish in a safe environment without incurring expensive cloud bills if you forget to destroy a kubernetes cluster which typically would be a minimum of 3 VMs + Master control plane VM.
After you will work with your local infrastructure, you will see that the big cloud providers all provide on top convenience services which makes companies and infra dependent. Therefore, after you become a master DevOps Engineer you will want to simply go back to do things yourself by using virtual machines in the cloud instead of using cloud services as self hosting proves to be much more efficient and cost effective in the long run.
There are open source tools which can help us simulate an AWS cloud locally and we’ll explore these later days.
The refurbished Secondhand Secret
If you have an older laptop, desktop, workstation you can turn that one into your homelab.
If you don’t have one you can turn into a “server” then I advise you to buy a secondhand or a refurbished workstation with 64-92 gb ram, 2-3 HDD/SSD drives and 4-12 CPU cores. SO you have enough juice to run a real workload. Similarly if you find cheap Lenovo Thinkcentres you can also get 2-3 of them and simulate your own “datacentre”. Having 1 single juicy workstation is mostly better since you can simulate your datacenter with VM’s anyway:). However, even if you have older laptops or systems you can simulate cloud systems, failure, recovery prety easily ;).
Case study in longevity and Return on Investment
IN 2016 I bought a refurbished HP z620 workstation for less than 2000 euro. 2 CPU 8 core Intel XEON, 92 GB ram to use for virtualization, cyber security, programming, devops, kubernetes etc. Had I bought it NEW with that hardware, I would have spent more than 10.000 euro.
Want to know the interesting thing? Even though it was refurbished (second hand) in 2016, it still works perfectly in 2026. I’ve since then only upgraded the SSD drives.
Depending on where you are located take a look at local refurbished shops, in the EU you even get 2 years warranty. Don’t go spending money on
New hardware - Deprecation is a killer, It’s not worth it, especially with the craziness around RAM, video cards etc.
Server racks and blades, etc. They take up a lot of space, before you’re sure you are into infrastructure use workstations since they are more powerwerful than regular desktops and more energy efficient than servers.
“Cool gamer aesthetics colored casing” - No one will see it. Your skills are more valuable.
RaspberryPI ARM notice
Theoretically you can use raspberrypi’s, however when using docker, containers, or kubernetes k8s you will have to manually crosscompile a lot of applications because of the ARM cpu. WHile this is a great way to learn devops, CI/CD it’s also going to frustrate you if you then plan to deploy to cloud as you’d need to keep 2 versions of each app. I ran kubernetes on raspberrypi’s which was interesting.
Extra points are awarded if you manage to interconnect multiple different CPU specs via libvirt in day 5.
After you have the hardware, wipe the hdd/ssd clean.
It’s now time to install a Linux distribution on your workstation/server/laptop. See day 3 on specifics of installing a linux distribution.
I recommend using Debian for the stability and security aspects. It’s rock solid, i’ve been running it on my personal and professional cloud virtual machines for 15+ years. You can go with whichever distro you prefer. I will be using Debian and demo commands for it in all future sessions so be sure to search for the alternatives for your distro while following along. Since tomorrow on day 5 of 100 days of devops we’ll be using KVM to virtualize other OS’es, the guest operating systems can be anything. Mac, Windows, TEmpleOS, FreeBSD:).
KVM stands for Kernel based virtual machine. It’s Linux virtualization technology used by almost all cloud providers. This technology allows you to abstract the physical resources such as cpu, gpu, RAM, disk into isolated flexible and scalable virtual environments. KVM uses virtualization extension found in your CPU, namely intel VT amd V for speed..
This is akin to 10 A4 pages and will take
Understanding hypervisors
A hypervisor is a virtual machine monitor which manages virtual machines.
Effectively splicing up your physical desktop, server or laptop or resources into parts.
Each Virtual machine has it’s own CPU, RAM disk and networking.
MOdern x86 AMD/INTEL processors have specific CPU instructions for virtualization.
THere’s type 1 and type 2 hypervisors.
The market is full of hypervisors including vmware, kvm, xen, hyper-v. Most virtualization tools use one of these.
Why KVM? Big Cloud Providers use it
KVM
KVM is the backbone of cloud infrastructure in the public internet
I’d estimate it to be way above 70% of total virtualization market share, GCP and AWS together are 42% of market share.
There are at least 12.788 large companies (1000+ employees) which publicly acknowledge they use KVM. 1
Amazon AWS datacenter and cloud used to use XEN as a hypervisor but began migrating to KVM 2
GCP (Google CLoud PLatform) uses Compute Engine which is a security hardened KVM based hypervisor (kernel based virtual machine) 3Since all cloud providers use KVM underneath their tech stack, YOU gain a great advantage by leveraging KVM on your systems
Everything OPenSource is packaged as a product for the uninitiated to consume
I’m also going to talk about various alternatives which you can use instead of going on the route of a specific CLoud Provider.
Most big cloud provieders provide the same software apps, with various API’s which lock you in.
The top 3 cloud providers AWS (Amazon) 28%, GCP (GOogle) 14% and Azure (Microsoft) 21% are followed by hundreds of “smaller” cloud providers such as Alibaba (4%), Oracle (3%) and even smaller ones like Linode, DigitalOcean, Vultr.
It’s important to understand that ALL cloud providers use open source technology repackaged to sell you the services which you can achieve on your own!
Understanding the pitfalls of vendor lock-in will help you tremendously. As if you’d go on the VPS or Baremetal route you can cut your cloud costs by 500%.
This guide presumes your hardware already has virtualization enabled in BIOS
What is libvirt qemu and how are they connected to KVM?
QEMU
QEMU stands for Quick EMulator and is an emulator and virtualizer meaning it can work directly with KVM.
However it also does emulation by JIT (just in time) binary translation which means you can also emulate different CPU instruction sets such as ARM, powerPC,risc-v. Making it invaluable when developing software if you don’t have hardware available or want to make development much faster.
LibVirt
Libvirt is a cross platform (MEANING YOU CAN USE IT ON Linux, freebsd, WIndows, MaCOS) toolkit which helps you manage virtualizaton platforms. is accessible from the command line but also hbas bindings in different programming languages such as C, Python, Perl, Go and more
It supports plenty of hypervisors including KVM, Hypervisor.framework, QEMU, Xen, Virtuozzo, VMware ESX, LXC, BHyve and more
The most important part is that it’s used by many applications and cloud providers under the hood..
Installing KVM and LibVirt
Install libvirt, qemu, kvm, some networking tools, guestfilesystem tools, virtual viewer and the GUI virt-manager for easier beginner management;)
Libvirt daemon should start automatically. In case it’s not start and enable libvirt daemon
sudo systemctl enable --now libvirtd
virt-host-validate
This will tell you if hardware virtualization is on
 QEMU: Checking for hardware virtualization                                 : PASS
  QEMU: Checking if device '/dev/kvm' exists                                 : PASS
  QEMU: Checking if device '/dev/kvm' is accessible                          : PASS
  QEMU: Checking if device '/dev/vhost-net' exists                           : PASS
  QEMU: Checking if device '/dev/net/tun' exists                             : PASS
  QEMU: Checking for cgroup 'cpu' controller support                         : PASS
  QEMU: Checking for cgroup 'cpuacct' controller support                     : PASS
  QEMU: Checking for cgroup 'cpuset' controller support                      : PASS
  QEMU: Checking for cgroup 'memory' controller support                      : PASS
  QEMU: Checking for cgroup 'devices' controller support                     : WARN (Enable 'devices' in kernel Kconfig file or mount/enable cgroup controller in your system)
  QEMU: Checking for cgroup 'blkio' controller support                       : PASS
  QEMU: Checking for device assignment IOMMU support                         : PASS
  QEMU: Checking if IOMMU is enabled by kernel                               : PASS
  QEMU: Checking for secure guest support                                    : WARN (Unknown if this platform has Secure Guest support)
   LXC: Checking for Linux >= 2.6.26                                         : PASS
   LXC: Checking for namespace 'ipc'                                         : PASS
   LXC: Checking for namespace 'mnt'                                         : PASS
   LXC: Checking for namespace 'pid'                                         : PASS
   LXC: Checking for namespace 'uts'                                         : PASS
   LXC: Checking for namespace 'net'                                         : PASS
   LXC: Checking for namespace 'user'                                        : PASS
   LXC: Checking for cgroup 'cpu' controller support                         : PASS
   LXC: Checking for cgroup 'cpuacct' controller support                     : PASS
   LXC: Checking for cgroup 'cpuset' controller support                      : PASS
   LXC: Checking for cgroup 'memory' controller support                      : PASS
   LXC: Checking for cgroup 'devices' controller support                     : FAIL (Enable 'devices' in kernel Kconfig file or mount/enable cgroup controller in your system)
   LXC: Checking for cgroup 'freezer' controller support                     : FAIL (Enable 'freezer' in kernel Kconfig file or mount/enable cgroup controller in your system)
   LXC: Checking for cgroup 'blkio' controller support                       : PASS
   LXC: Checking if device '/sys/fs/fuse/connections' exists                 : PASS
Normally you should enable the specific virtualization for your CPU via BIOS, check if it’s supported.
LXC failures don’t really concern us right now. LXC was a precursor to docker which made the whole containerization possible.
However, yes, you can use libvirt for containers aswell
Providing CGROUPS to VM Guest
To fix the warnings in QEMU you need to edit some grub settings such as iommu=pt intel_iommu
This really depends how deep you want to test virtualization and if you’re planning to squeeze most:)
INstalling a Virtual Machine
The first step to installing a VM is to manually download a ISO and manually go through the installation process.
While this is OK in many cases especially if you want to ensure you install and configure your desired operating system it will become bothering and boring after the 10th install. So we will atuomate this process.
There’s tools like debootstrap
to automate a installation of a debian into a folder, which we can convert to a VM.
The added benefit of using debootstrap is that YOU can automate AND get which packages go into your VM making sure you minimize security incidents by not relying on 3rd party “images”
THere’s also a better way, there are official cloud images of most Linux distributions including Debian which can be used on
NOTE: Use .raw files if you have a filesystem with copy on write enabled such as ZFS, btrfs etc. Use qcow2 if you’re using ext4 or anything else. You CAN use qcow2 on ZFS but you’ll have double copy on write allocations for every modified data block. Meaning will probably be slower, I haven’t benchmarked in production so we’re going on the safe side.
if you’re running zfs you may want to download a qcow2 and convert it to a zvol ;). This maps the VM image to a ZFS zvol. It’s similar to how overlayfs works for docker containers.
qemu-img convert -O raw <infile.(vdi|vmdk|$whatever)> /dev/zvol/rpool/data/<vmid>-disk0
INstallatin process
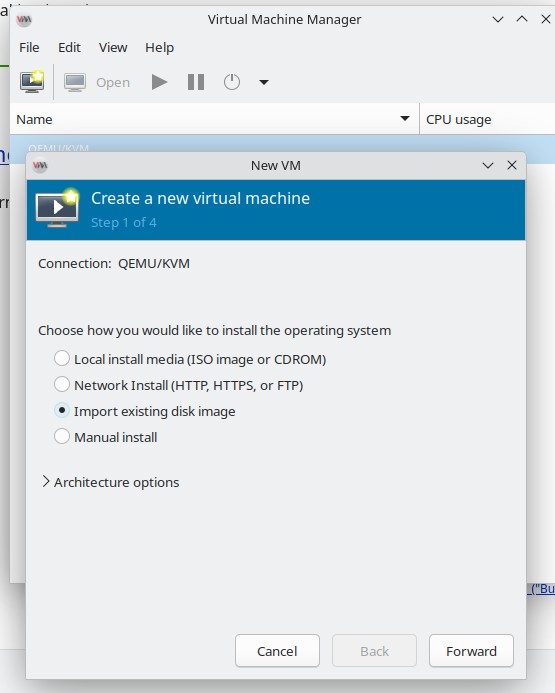
I’m now going to show you the manual process of installing virtual machines which I still use when experimenting.
Open Virtual Machine manager on your Linux machine
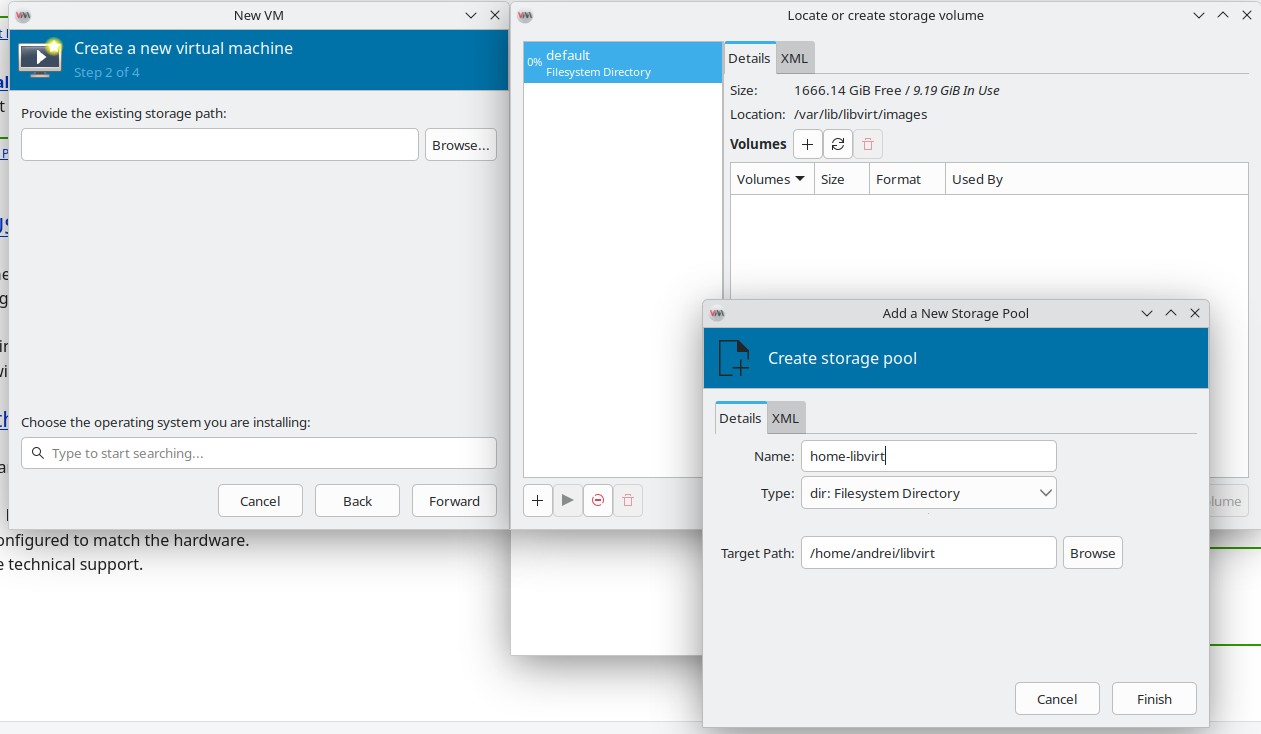
Add path
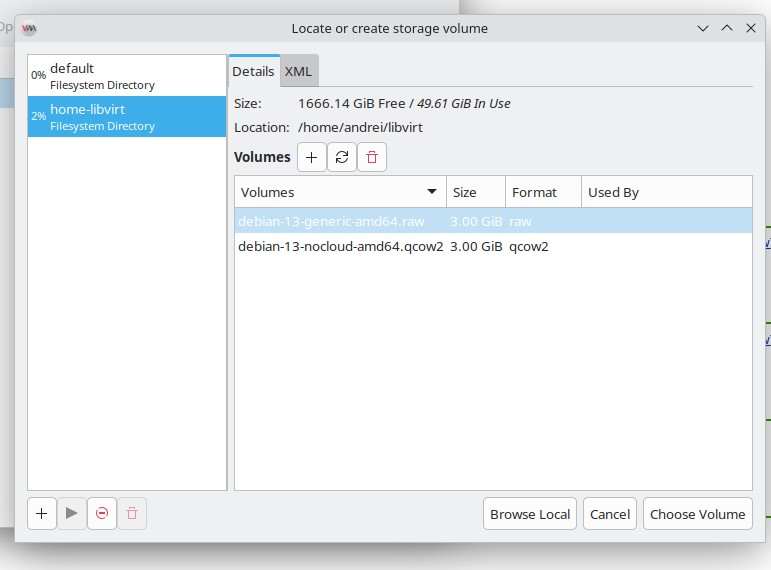
Select the debian linux IMG
You can also choose “browse local”.
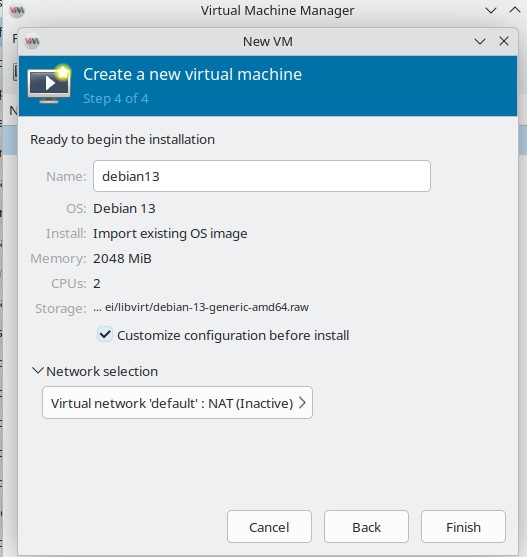
Select Debian13 as Operating System. 2048 GB 2 CPU is OK, we can change that later
Start the VM
NOTE: Make sure you make a copy of the RAW/QCOW2 fileas that’s the disk the virtual machine will use:) and it will start writing it. .qcow2 or using zfs volumes is super helpful here as you can just copy/paste the volumes around and ensure you can snapshot disks around.
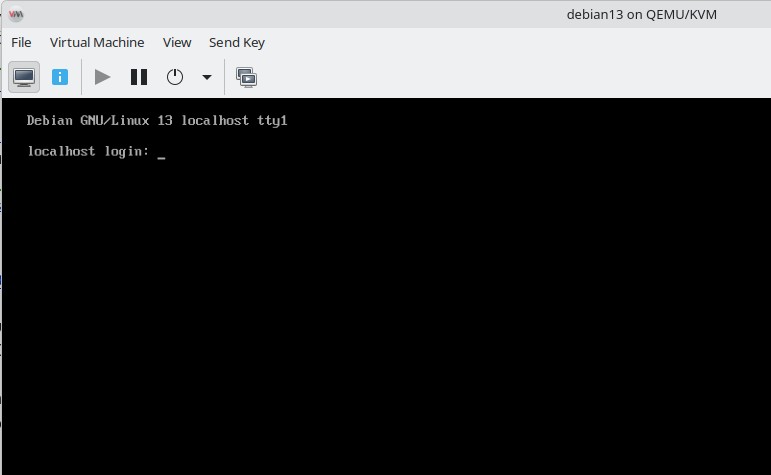
You should be greeted with login interface
Usually the username root with a blank password should work.
setting a root password and customizing some details
Sometimes this won’t work… so we go the route of setting up a password. There are multiple manual ways to do this via grub editing .
However, as a DevOps you will want to use commands to automate your workflow.
Shut down your VM before attempting this. DO it via virt-manager or with virsh shutdown debian13 (or whatever name you gave it!)
THe following command will set the root password, hostname and will run ssh-keygen and start sshd;)
virt-customize -a /home/andrei/libvirt/debian-13-generic-amd64.raw --root-password password:MyAmazingPassword --hostname "devopsmagic" --firstboot-command 'ssh-keygen -A && systemctl restart sshd'
Reboot the VM, you should see the VM devopsmagic name changed and you can login with the password for root;).
COmmand Line Usage
First set the libvirt default uri to the system one (root). You can also use the local user’s libvirt session qemu:///session
Accessing QEMU KVM instances via SSH from other machines
Notice the format, as you deepen your DevOps and linux
knowledge, use something akin to qemu://192.168.135.27/session to access the KVM qemu sessions from different hosts.
Accessing remote systems from the internet and making your own cloud SSH as qemu+ssh://username@hostname/system.
Setting default libvirt URI:
export LIBVIRT_DEFAULT_URI=qemu:///system
virsh list
Because you’re a devops, you will want to use the command line to manage virtual machines or use scripts for this process.
A bash script in a git or fossil repository is a first step to establishing infrastructure sa code
The –noauthconsole ensures you won’t get the console slpash which allows you to login to it directly without the need to use SSH.
Opening a windowed viewer for the machine
An auto VNC system to login to your machine which is super useful if you have a GUI.
virt-viewer debian13-devops
Opening a console in your terminal
SSH-ing into the console is the best, however virsh allows you to get access to a console within the virtual machine automatically. Meaning you can copy paste commands seamlessly from your system.
virsh consoloe debian13-devops
cloud init configuration and virtual machine install automation
Oftentimes you will use cloud init for configuration of cloud images.
Meaning you can specify a lot of automation steps.
If this looks similar to how ansilble or terraform works, it’s basically almost the same thing. All cloud providers use this when you purchase a VPS or a service to setup your virtual machine;)
#cloud-configusers:
# whatever username you like - name: andrei
# so our user can just sudo without any password sudo: ALL=(ALL) NOPASSWD:ALL
shell: /bin/bash
# content from $HOME/.ssh/id_rsa.pub on your host system ssh_authorized_keys:
- ssh-ed25519 AAAAC[the rest of your ssh key here]Z
The following create a username called andrei define the default shell, copy over the ssh authorized keys so I can ssh into the VM
without password AND will grant me sudo without asking ffor password.
The sudo part is useful for local deveopment, maybe disable it for
The previous if run in Linux will automatically open the console ;) into the machine.
Internet issues in VM?
IF running the cloudinit version internet should WORK properly, when running the non cloud init version networking MAY fail to work.
Please note that there is an issue on debian 13 resulting in broken network connections when running virt-customize which we wil do later. If you run into this issue, also install these packages
sudo apt install \ systemd-resolved \ dhcpcd-base
NOTE
On some systems this might make the internet and DNS networking fail so maybe install these ONLY if the rest of the walkghrough options don’t work for you
Run this on host
sudo vim /etc/libvirt/network.conf
firewall_backend=nftables
# :wq! save & exit vim;)sudo systemctl restart libvirtd
Check ip forwarding
cat /proc/sys/net/ipv4/ip_forward
If it returns 0, enable it:
sudo sysctl -w net.ipv4.ip_forward=1
If all else fails… reboot your HOST machine. I know, Linux and *BSD systems don’t need reboots like Windows, however sometimes when all else fails this can be tried.
Explore LibVirt Extra Might and Magic
You can use libvirt, virt-manager, virsh etc to connect to multiple machines running KVM/Linux
THis enables failover, high availability and a plethora of other nice features like live migration of
Explore these on your own.
COnclusion
RUnning KVM locally on a Linux machine is the first and best step to get started with Virtualization for real.
You can build and sell your own cloud VPS
If you build a simple UI web interface you can now easily deploy VM’s for people and ask for money, effectively creating your own cloud infrastructure, it’s this easy.
There are some extra steps but the process is pretty simple one you get the hang of it
TODO VIDEO
TODO still have to explain how to set it up ;) and make a video about it:) but this is for later
If Day 5 of 100 days of FullStack DevOps was KVM Virtualization, Day 6 is about containers with Podman. Usually on a VM or VPS (we’ll get to it on day 7!) we want to run software, if we can’t run self contained apps directly under systemd (or your favorite init system) we’ll have to consider running our software in containers for ease of use.
We’ll get back to virtualization automation in future days.
For a long time, “Docker” was synonymous with “Containers.” However, containers or linux namespaces which are the underlying feature Docker, Podman and other containerization technologies use, have been in existance since 2002, that’s 11 years before docker even existed. LXC was a leader in linux containers.
As we lean into the philosophy of Sovereign Engineering, we need tools that respect the OS, follow standard security models, and don’t rely on a single “all-powerful” daemon.
Thus we’ll be demonstrating Podman.
Originally developed by Red Hat and written entirely in Go, Podman isn’t just a Docker clone; it’s a fundamental rethink of how containers should behave on a Linux system.
Why Podman? Breaking the Daemon Monopoly
The biggest architectural difference is that Podman is daemonless.
When you run a command in Docker, you are talking to the Docker Daemon (dockerd) which runs as root. If that daemon dies, your containers can get orphaned. If that daemon is compromised by a security issue, the attacker has the keys to your entire kingdom. Talking about CopyFail CVE-2026-31431 this is a big problem.
Podman follows the “Fork/Exec” model, similar to how your shell works. When you run a container, Podman starts a process directly. This makes it OCI (Open Container Initiative) compliant and much more resilient to existing problems.
Installing Podman
To install podman you can follow the instructions on https://podman.io/docs/installation for your operating system
If on debian, you can always run
sudo apt install podman
However, it will likely have a outdated version of podman.
PODMAN is also available on FreeBSD 14.3 and newer! Where docker is NOT avilable, so if you use FreeBSD podman is the way to go for containers.
Dropin alias Docker - Podman
After you’ve insstalled Podman you can easily do an alias like
alias docker=podman
And you won’t even notice it;)
The Ecosystem: Buildah, Skopeo, and Podman-compose
Podman is part of a modular “Swiss Army Knife” for containers which are meant to provide some alternatives to some docker functionalities.
Keep in mind that podman is a drop in replacement for docker, meaning you can use Dockerfiles just fine, however, there are some other specific tools you can use such as:
Buildah: A tool specialized in building images. It allows you to build OCI images without needing a full container engine running.
Skopeo: A powerhouse for inspecting, copying, and signing images across different registries without having to “pull” them locally first.
Podman-compose: The seamless transition for those coming from the Docker-compose world.
The Killer Feature: Rootless by Design
Seven years ago (2018~2019), the idea of “rootless containers” was experimental. Today, it’s the gold standard.
Podman allows “normal” users to run containers without needing to grant yourself rights to specific users,groups or to run as root with sudo or su. It leverages User Namespaces to map a non-privileged user on the host to a “root” user inside the container.
Benefits:
Security: If a process escapes the container, it still only has the permissions of your local user on the host. It cannot touch /etc/shadow or format your disk.
Native SELinux Integration: Podman works out-of-the-box with SELinux, providing labels that prevent containers from peeking into each other’s data or the host’s files.
Lower Resource Footprint: No background daemon means lower idle memory and a smaller binary size.
Podman + Systemd: The DevOps Secret Weapon
This is where Podman truly shines for the Linux purist. Because Podman doesn’t have a daemon, it relies on the OS’s native manager: systemd.
Instead of relying on Docker’s internal --restart always policy, you can treat a container like any other system service.
Generating a systemd configuration which you WILL Be able to run as a user is easy just run
podman generate systemd
For rootless containers, these will be stored under the user’s directory:
$HOME/.config/containers/systemd/
systemctl --user daemon-reload
To see the status of the container with systemd as a user
systemct --user status myapp.service
This means you can use restart/start/stop with systemctl;)
THe neat thing is you can run podman without requiring root, thus if you have a multi user environment each user may have his/her own containers.
Greatly simplifying even continous integration continous deployment/delivery.
Quadlets: The Modern Way
Podman introduced Quadlets, which allow you to define a container in a simple .container file. Systemd then automatically generates a service for it. As of 2022 this has been integrated in to podman itself.
User-Level Services: You can run containers as a user (systemctl --user start my-app).
Journald Logs: Container logs aren’t hidden in some obscure Docker JSON file. They are piped directly into journald. You can use journalctl --user -u my-app to see what’s happening, just like any other app on your system.
This integratin makes sysadmin much easier.
The “Zero-Registry” Workflow
Standard DevOps tutorials tell you that you must have a centralized registry (DockerHub, GHCR, etc.). But what if you’re working on a private network or a “Sovereign” homelab?
Running a docker registry just for your system is overkill, there are better ways to achieve this.
You can move images around like standard files using the power of the pipe (|).
Pushing an image over SSH:
podman image save my-app | ssh user@server.com podman image load
Optimized with compression (faster for slow networks):
Day 7 🚀 Your First Linux Virtual Private Server - steps to freedom
Today we’re about to embark on a marvelous journey of setting up your first Linux Cloud Virtual Machine also known as VPS (Virtual Private Server).
If you followed allong with the previous You might be puzzled toat I told you to you buy or install Linux on existing or old hardware. You might be thinking: “Why is he jumping to doing things on a VPS after explicitly telling us to go get some physical hardware?”
Table of contents
There are multiple reasons. First is that you might not have bought any harware nor installed Linux as a main OS. Second, using a VPS is a bridge. We are going to connect our local, physical infrastructure with our VPS later on. Plus, for just $5 a month, we can perform massive amounts of “engineering magic” that would cost hundreds on the “Big 3” cloud providers.
Third, you might want a reliable cheap server online to just host a few things and from a security standpoint it’s less of a hassle than exposing a machine from your home which you have yet to learn how to secure
The Dependency Trap
You won’t believe the amount of developers who have no idea how to host and deploy the software they’ve built. We are talking about both backend and frontend engineers with years of experience. Companies have created perfect silos to keep people dependent on proprietary “magic buttons.” Numerous companies have spun up offering these simple and basic services which are so easy to do.
They’d rather pay exorbitant fees to a cloud provider than master a simple $5 machine.
The $5 Proof:
I’ve been running a single $5 VPS with 1GB of RAM for over 15 years. At any given time, I’ve had 20 different apps running on it. If I had used specific managed cloud services for all 20, I would have spent hundreds of dollars per month. Mastering the VPS isn’t just a skill—it’s a massive financial advantage.
Granted, I now have 3 VPS’es and a raspberry PI for my personal projects, but still 2 of them are 1GB RAM and run perfectly with quite some apps and databases. This is because if you optimize carefully, you can do a lot of things. Sure, your Java apps might not run on a 1 GB vps.. Maybe try a GOlang app?:).
Step-by-Step instructions to Provision your virtual private Linux server
You can watch the video HERE, or you can follow along in text format.
1. Choose Your Provider
The video uses Linode (Akamai), but the principles apply to Cloudify, Hetzner, DigitalOcean, or Vultr or anyother cloud provider.
All you need to do is sign-up, and choose the cheapest VPS available.
Region: Pick a location closest to you or your customers to minimize latency (e.g., Amsterdam for Europe).
OS: Select Debian 13. It is the rock-solid foundation for most professional deployments.
Plan: Start with the “Nanode” or the cheapest 1GB RAM plan. You can always scale up, but scaling down is much harder once your disk expands.
2. Set a long Password
Don’t use something easy, don’t try to remember your password, and lastly DO NOT USE A CLOUD password manager! Use a password manager like KeePassXC.
Strive for 35+ characters or more, these will become almost impossible to be brutforced.
In the provisioning menu, you can also add your SSH Keys (highly recommended for security, as seen at [05:32]).
We’ll get to setting up
3. The First Login
Copy your IP address from the dashboard and open your terminal, if you’re on linux you’ve got everything installed,if you’re on windows you might want to install WSL or download putty.
ssh root@your_server_ip
If you get a “fingerprint” warning, type yes. Once inside, your first move should always be to update the package list:
apt update
🌐 Deploying Your First Web Server (Caddy)
We use Caddy because it is the easiest web server to use, written in Go, and handles HTTPS automatically.
1. Installation
Follow the Caddy installation documentation for Debian to get the binary on your system.
2. Verify the Installation
Once installed, visit your server’s IP in a browser. You should see the “Welcome to Caddy” page [06:52].
3. Live Editing with Vim
To change the page, navigate to the default directory (usually /var/www/html) and edit the index.html:
cd /var/www/html
vim index.html
To Edit: Press i (Insert mode).
To Save & Exit: Press Esc, then type :wq! and hit Enter.
Note: Learning to exit Vim is a rite of passage for every elite hacker [08:35].
So you need to press
esc :wq!
FAQ
You might have a lot of questions..
🛡️ Important: What’s Next?
Right now, you are logged in as root. This is dangerous for daily use. Apart from my Raspberry Pi at home, I run 3 personal VPS instances and dozens for clients. The secret to managing them all is Hardening.
Your immediate next steps are to follow days 8 and 9:
Day 9 Secure the VPS: Create a non-root user, disable root login, and set up a firewall.
20+ Years of Code & Linux, Curiosity, and “Beginner’s Eyes”
Hi, I’m Andrei Clinciu. I’ve been told I’m a “Unicorn Engineer” also known as a “Generalist”. In an industry that loves to silo people into “Frontend,” “Backend,” or “Sysadmin,” I’ve spent the last two decades refusing to choose. I started “coding” when I was 13. I began with something which “modern” teens will probably not encounter, namely IRC and IRC eggdrop bots which got me into programming. Back then, there were no tutorials, courses or books, and being a kid I had no idea how to “research”. So I had to learn by trial and error and hardships. I’ve always chosen a peculiar path and used very niche programming languages (Tcl, Elixir, Erlang) and tools.
Since then, I’ve obsessed over how computers function (hardware, networking & sysadmin), how software scales , and how to keep the “bad guys” out (Cybersecurity). Even though I went through all these different subdomains in IT I always came back to software development since that’s what
Why “Beginner’s Eyes”?
The path to mastery isn’t about knowing everything; it’s about the courage to unlearn and relearn. Even after 20 years of Linux sysadmin work and programming in Go, Elixir, and Tcl, I approach every new project as if I’m seeing it for the first time. If you aren’t afraid to relearn the basics, you’ll always find a better way to do them. Now, this does not mean I go after the shiny new framework or library out there each time. It means I try to be as pragmatic as possible. Prefering a simple solution over over-engineering, which is the case with today’s world.
My “Pragmatic” Stack
I don’t chase hype. I chase Results.
Minimalism: I prefer a single Go binary over a 50-container microservice mess.
Sovereignty: I self-host my code on Fossil SCM because I want to own my history, not rent it from Microsoft/GitHub.
Truth in Plaintext: My documentation lives in Markdown and Asciidoctor. If a tool doesn’t support plaintext, I probably won’t use it.
local easy to inspect & backup database (sqlite, kvdb, etc)
no external dependencies (self contained)
Contact me
Send me an email andrei+fullstackdevops[at @]subl.im
Giving Back
fullstackdevops.eu is my way of giving back to the community in an era of Artificial INtelligence slop. I’m sharing things I’ve gathered over decades—hard-earned lessons in debugging, the art of researching, and building “bulletproof” automation.
Want to join the conversation? In the future I’m going to launch aa private-first community at /community where I provide deep-dive architectural advice.